自社ブログにmeilisearchを導入する
2024-09-03

#目次
#はじめに
自社のブログにmeilisearchを導入しました。
現在、開発中のプロダクトでmeilisearchを使っているのですが、その機能が非常に便利だったので、自社ブログにも導入しました。
#meilisearchとは
Meilisearch is a flexible and powerful user-focused search engine that can be added to any website or application.
Lightning fast
Search-as-you-type returns answers in less than 50 milliseconds. That's faster than the blink of an eye!
Plug-n-play
Deploy in a matter of minutes. Smart presets let you start searching through your data with zero configuration.
Ultra relevant
Take advantage of the most advanced full-text search engine with its out-of-the-box great relevancy that fits every use case.
出典:Meilisearch
公式の引用は上記の通りです。
meilisearchは、検索エンジンです。検索エンジンといっても、Googleのようなウェブ全体を対象とするものではなく、特定のサイトやアプリケーションに組み込むことを想定しています。
OSSなので、ローカル環境でも動かすことができます。
日本語の全文検索にも対応しています。
elasticsearchのようなシャーディングなどやクラスタリングなどの冗長構成は、セルフホスト向けには提供されていません。
導入は簡単です。UI周りはalgoliaと互換性があります。algoliaのreact-instantsearchを使っている場合は、ほとんど変更することなくmeilisearchに移行できます。
よくドキュメントサイトなどで使われる検索機能が、doc-scraperというクローラーと組み合わせて使うことで、ドキュメントサイトに簡単に検索機能を導入することもできます。
#導入戦略
当社のサイトは、Next.jsで構築されています。
主にMarkdownで書かれたページをSSGでビルドして、その静的ファイルをcloudflare pagesでホスティングしています。
そのため、meilisearchを導入するにあたり、クライアントサイドでの検索を行うことにしました。
UIは、react-instantsearchを利用しました。これは、UIのコンポーネントも提供されていますが、Hookも提供されているので、UIは自由にカスタマイズできます。当社のサイトはshadcn-uiを利用してUIを構築しているので、スタイルはカスタマイズしたいと思っていました。
meilisearchはクラウドサービスを提供していますが、今回はセルフホストで導入しました。学習目的ということもありますが、セルフホストであれば、コストを抑えることができます。
機能については、下記を実装します。
- タイトル、本文の全文検索
- タグによるフィルタ
- 記事の公開日による並び替え
- 記事の表示件数の制御
- ページネーション(infinite-hitsで実装)
#実装
#meilisearchの起動
ローカルで開発ができるよう、docker-composeでmeilisearchを起動します。
services:
  meilisearch:
    image: getmeili/meilisearch:v1.9.1
    ports:
      - 7700:7700
    environment:
      - MEILI_MASTER_KEY=masterKey
- MEILI_NO_ANALYTICS=true#indexの作成
記事のインデックスは、手動で更新するスクリプトを作成しました。
もともと、記事は、Markdownで管理しているので、Markdownをすべて読み込んで、meilisearchに登録するスクリプトを作成しました。
コードは、下記の通りです。
import { Article } from "@cloudandbuild/ui/types/article";
import * as cheerio from "cheerio";
import { EnqueuedTask, MeiliSearch } from "meilisearch";
import { getAllPosts } from "./markdown";

const indexName = "blog-posts";
async function main() {
  const client = new MeiliSearch({
    host: process.env.MEILI_HOST || "http://localhost:7700",
    apiKey: process.env.MEILI_KEY || "masterKey",
  });
  const posts = await getAllPosts();

  // post to index document
  const docs = [];
  for (const post of posts) {
    const $ = cheerio.load(post.html);
    const p = $("p").text();
    const li = $("li").text();
    const doc: Article = {
      id: post.id,
      title: post.title,
      description: post.description,
      imageURL: post.image,
      content: p + " " + li,
      tags: post.tags,
      publishedAt: post.posted_at.getTime(),
      author: post.author,
    };
    docs.push(doc);
  }

  // Create index if not exists
  const indexesRes = await client.getIndexes({ limit: 100 });
  if (indexesRes.results.findIndex((idx) => idx.uid === indexName) === -1) {
    await client.createIndex(indexName);
  }

  // Delete old indexes
  const delIndexes = indexesRes.results.filter((idx) => idx.uid !== indexName);
  for (const idx of delIndexes) {
    await client.deleteIndex(idx.uid);
  }

  // create Index and update settings
  const now = new Date().getTime();
  const indexNameWithTime = `${indexName}_${now}`;
  const queued: EnqueuedTask[] = [];
  let task = await client.createIndex(indexNameWithTime);
  queued.push(task);

  const index = client.index(indexNameWithTime);
  task = await index.updateSettings({
    displayedAttributes: [
      "id",
      "title",
      "description",
      "author",
      "tags",
      "imageURL",
      "publishedAt",
    ],
    searchableAttributes: ["title", "description", "content", "author", "tags"],
    filterableAttributes: ["author", "tags", "publishedAt"],
    sortableAttributes: ["publishedAt"],
  });
  queued.push(task);

  // Add documents
  task = await index.addDocuments(docs);
  queued.push(task);

  // Swap indexes
  task = await client.swapIndexes([
    {
      indexes: [indexName, indexNameWithTime],
    },
  ]);
  queued.push(task);

  // Wait for task to complete
  const tasks = await client.waitForTasks(queued.map((t) => t.taskUid));
  const hasError = tasks.find((t) => t.status !== "succeeded");
  if (hasError) {
    console.error(hasError);
    throw new Error("Task failed");
  }
  console.log("Done");
}
(async () => {
  try {
    await main();
  } catch (e) {
    // Deal with the fact the chain failed
    console.error(e);
  }
})();
やりたいことは、現行のインデックスを新しいインデックスに安全に切り替えができることです。
そのため、毎回新しいインデックスを作成し、新しいインデックスにデータを登録し、古いインデックスと新しいインデックスを入れ替えることで、安全に切り替えができます。古いインデックスが溜まっていくので、インデックスの削除も行います。
また、meilisearchは、ゼロコンフィグでも使えますが、フィルタリングの設定などは追加する必要がありますし、全文検索のフィールドなども設定したほうが良いでしょう。デフォルトだとすべてのフィールドが検索対象になります。
#UI
参考にしたページは下記です。
詳細は割愛しますが、React InstantSearch Referenceに各コンポーネントの使い方が記載されています。この中に、Hookを利用したUIの実装例があります。この実装例を参考に、shadcn-uiで実装しました。
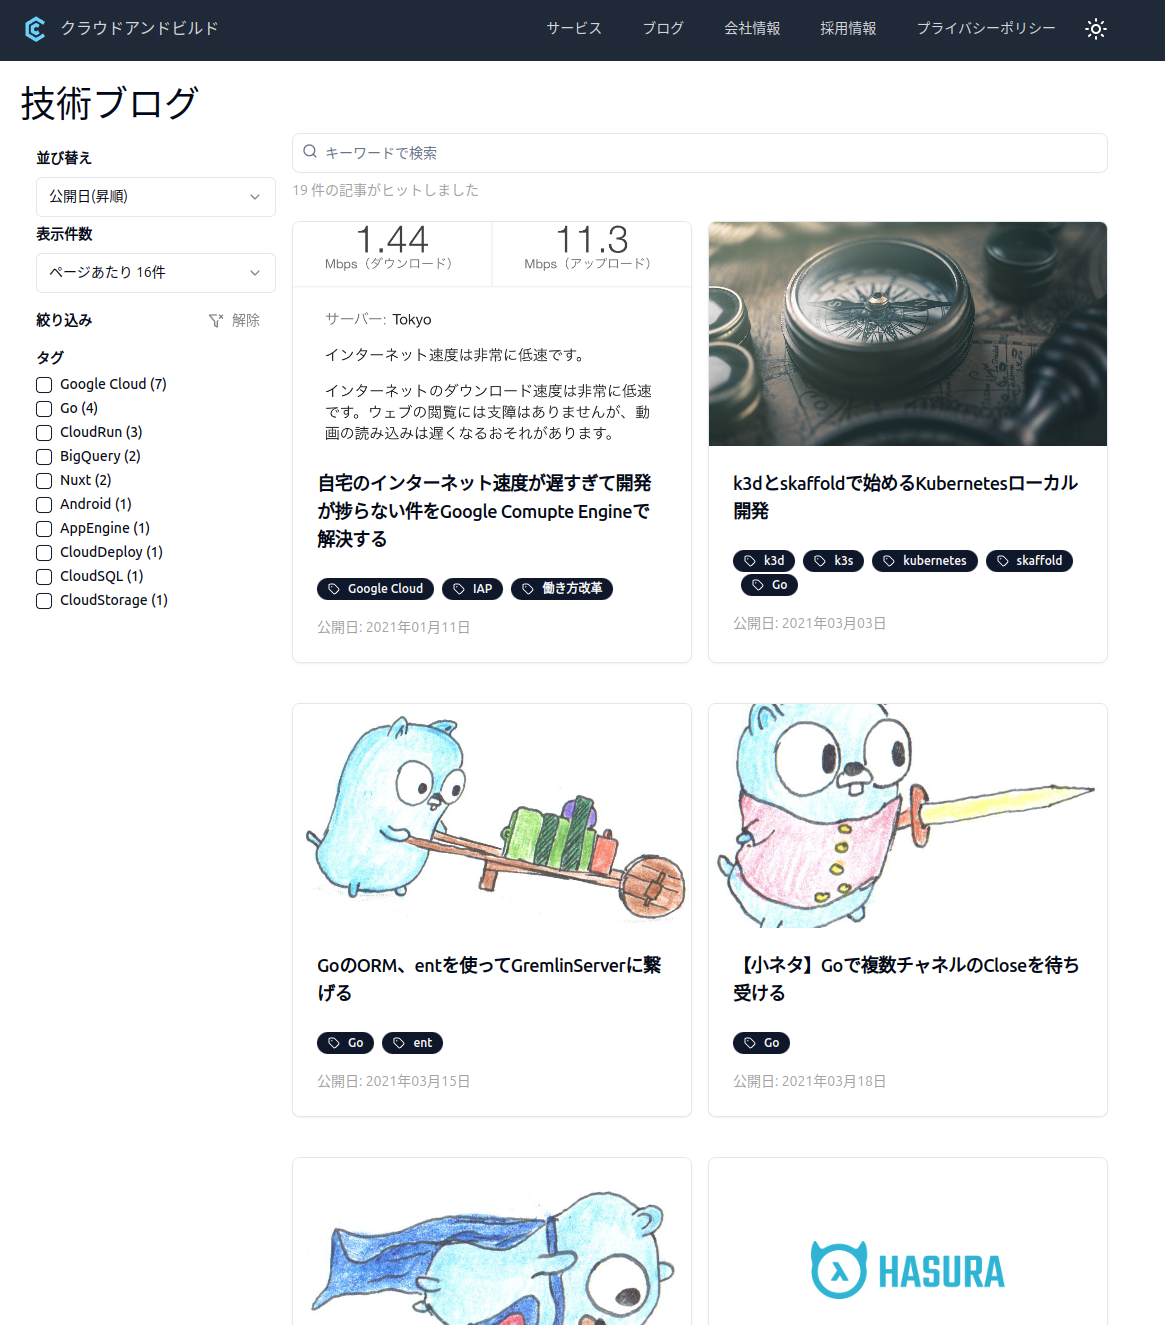
UIのイメージは下記の通りです。

#Deploy
meilisearchは、プロダクション向けにはk8s上で動かします。
マニフェストは、helm(helmfile)で管理します。
meilisearch-kubernetesにhelm chartが公開されているので、それを利用します。
helmfile.yamlの例
{{ readFile "../../bases.yaml" }}
---
repositories:
  - name: meilisearch
    url: https://meilisearch.github.io/meilisearch-kubernetes
releases:
  - name: meilisearch
    chart: meilisearch/meilisearch
    namespace: database
    version: 0.9.1
    inherit:
      - template: default
values.yamlの例
environment:
  MEILI_ENV: production
  MEILI_MASTER_KEY: "<ランダムに生成したmasterKey>"

ingress:
  enabled: true
  className: traefik
  path: /
  hosts:
    - meilisearch.cloudandbuild.jp

persistence:
  enabled: true
  size: 10Gi
storageClass: local-pathこれらの設定を行い、helmfile applyでデプロイします。
API Keyを生成します。デフォルトで検索用のAPI Keyが生成されていますが、それを使うと、すべてのIndexにアクセスできるので、目的のIndexだけにアクセスできるように新しいAPI Keyを生成します。
export MEILI_KEY=<masterKey>
curl \
  -X POST 'http://localhost:7700/keys' \
  -H "Authorization: Bearer $MEILI_KEY" \
  -H 'Content-Type: application/json' \
  --data-binary '{
    "description": "search from frontend for prod",
    "actions": ["search"],
    "indexes": ["blog-posts"],
    "expiresAt": null
  }'
frontendのデプロイは、GitHub Actionsで行っていますので、前述で取得したkeyを追加のシークレットを設定しました。
#まとめ
今回は、自社ブログにmeilisearchを導入しました。
meilisearchは、検索エンジンですが、UI周りも提供されているので、簡単に検索機能を導入することができます。
また、meilisearchは、OSSなので、セルフホストで導入することもできます。
別の開発中のプロダクトでは、Postgresからデータを取得してGo言語でmeilisearchにドキュメントを登録していますが、比較的簡単に導入できました。
ブログの検索が便利だと、ブログ記事を書くモチベーションが上がりますね。
今回のユースケースでは利用しませんでしたが、ドキュメントサイトを作る際には、doc-scraperを使うとリッチな検索機能を簡単に導入できるので、機会があれば試してみたいです。
